Git Primer
With GitHub Desktop installed and a basic familiarity with the GitHub web interface, it’s time to dig in.
Create a Repository
Open the
Filemenu and clickNew Repository
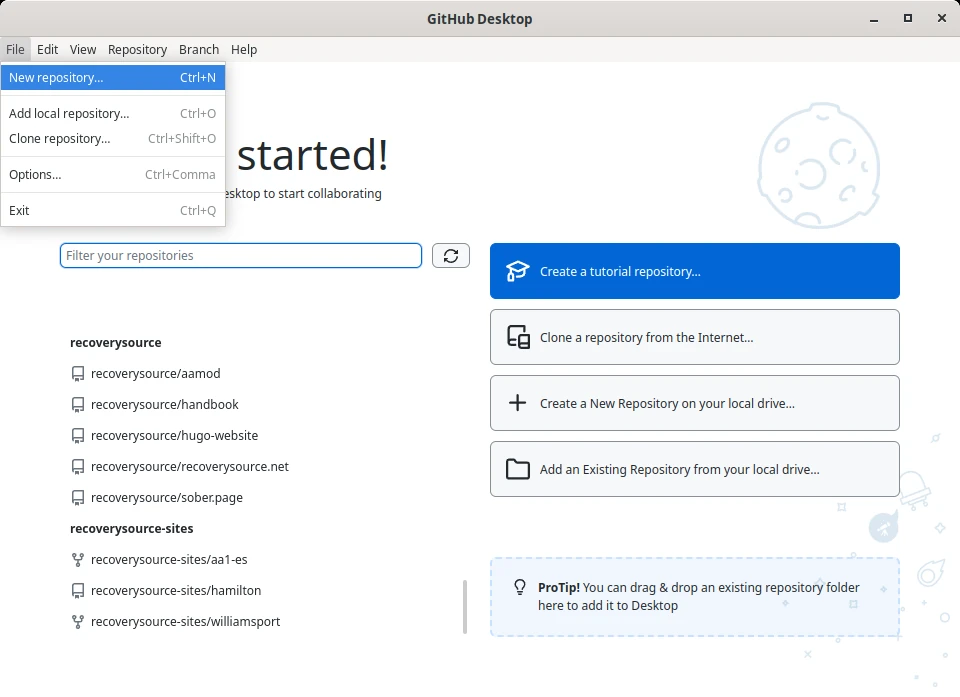
For this demonstration, the repo
Nameshould be your own username, assuming it does not contain special characters, with.github.ioappended. So the usermtecknologyshould usemtecknology.github.io.Putting something online does not make it FOSS; in order for others to (legally) download a copy, it must have a license that permits this activity.
GitHub Desktopprovides a number of safe options, withMIT (Expat)andThe Unlicensebeing the most open.
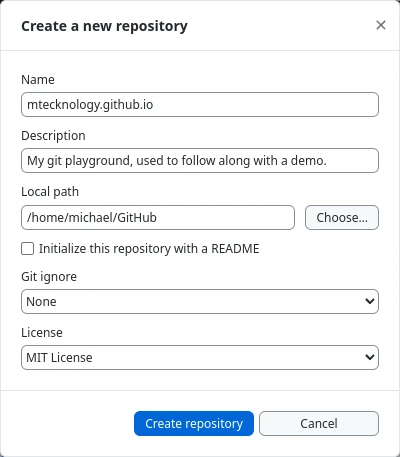
Click
Create repositoryand GitHub Desktop will create an emptygitrepository on your own computer.
Congratulations, you now have an empty git repository waiting for changes.
Create a File
This section describes how to change the content of files.
Note
When opening files in an editor, it is often helpful to use the
right-click menu to use Open With ..., rather than double-clicking
to open.
With the empty repository created, click
Show in your File Manager.This will open a separate
file browser, which will be used to navigate the contents of your repository.There is already a
LICENSEfile with content from the earlier selection.We want to create a new text file in this directory with the file name
README.md.Open this new file in your favorite text editor.
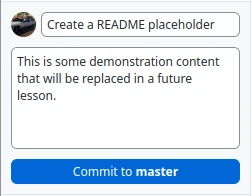
Copy and paste the following content for this file:
This is a git playground for my personal experiments.
Save and close this file.
Return to
Github Desktopand notice that it has detected a change.

This shows us that a README.md file was created with the content that we
expect.
Create a Commit
Now that there are “uncommitted” changes, the first commit can be created.
No matter how trivial or experimental the changes are, the most important
step is to create a high quality description of the change you are making.
This commit message explains to everyone else why a change was made.
In the example above, we created a README.md file and provided some content.
Notice that the “Summary” is already filled in with “Create README.md”.
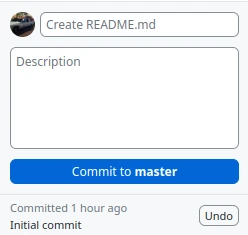
Caution
Write your own summary! DO NOT use the default!!!
Taking the time to write a high quality commit message that explains why a change is being made is the most important step in any change. This not only forces you to explain the change that you are making, but also ensures that anyone coming after (including yourself) can look back and know exactly why something was done a specific way.
After coming up with a “good” commit message, click Commit to master/main.
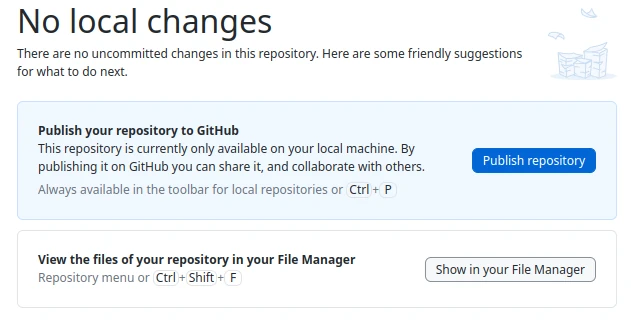
This action should complete quickly and will return you to No local changes.
First Publish
To initially publish these committed changes (commits) to GitHub, click
Publish repositoryfrom withinGitHub Desktop.NameandDescriptionshould already be filled in.Important: Be sure to Uncheck
Keep this code privateClick
Publish repositoryYou now have the option to
View on GitHub
Your web browser will now open https://github.com/ and navigate to this project.
The default view provides a list of files in the git repository, as well as
a reading pane with two tabs for “readme” and “license”.

More Content
This git repository is still pretty barren, and now is a great time to
populate it with some very basic sample content.
Using your file manager:
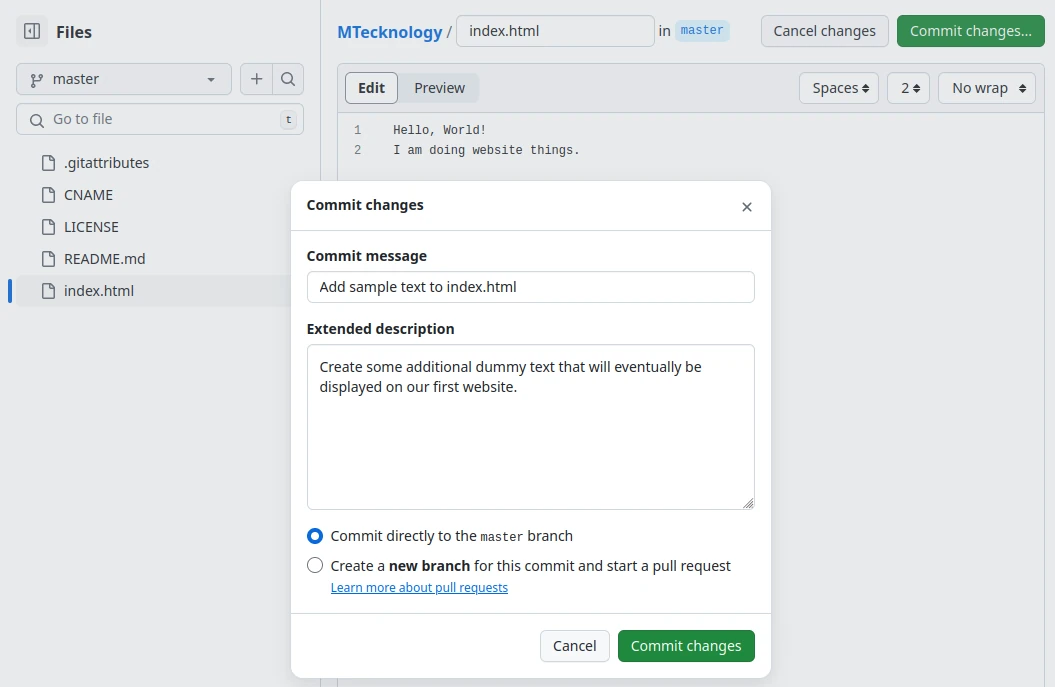
Create a file named
index.htmlwith the content:Hello, World!
Create a file named
CNAME, replacing USERNAME with your own:USERNAME.github.io
Provide a high quality commit message!
Your
GitHub Desktopshould currently look like this:

Click the
Commitbutton to save these changes with the description!
Push Changes
Like our initial publish, all changes are kept local until we “push” them up to
the “origin” server. This synchronization operation takes all local commits
and uploads them so that others can download your changes.
Click
Push originto send your local changes up to the server.
Simulated User
It is possible to use the GitHub Web Interface to make changes to files;
this allows us to partially simulate the actions of another user.
Navigate to your project on https://github.com using
View on GitHubOpen the
index.htmlfile that you just pushed to “origin” (GitHub)Add any arbitrary text to the file, such as
I am doing webite things.Click “Commit changes…”
Provide a meaningful commit message:
Fetch Changes
The only synchronization operation more important than the push, is the
fetch. This allows you to download the changes that other people have made
since you were last working on this git repository.
The more active a project becomes, the more likely it is that two peoople may attempt to modify the same file within hours apart. The most often changes are fetched, the more likely you will be working on files that have no pending changes.
Click
Fetch originto verify the server has no changes for you.In the previous step, we created changes in order to simulate another person who made some changes.
We now have a number of options for how to review these changes before we
pullthe changes into our working (current) copy.For now, click
Pull originto automatically accept these changes.
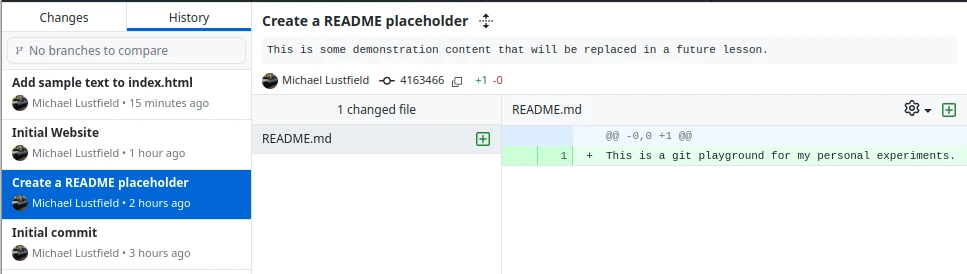
History
This repository now has a short history of changes, and we may have already forgotten what steps we last performed, or we may have made an incorrect change that we want to identify.
Use View > History from the menu to see a list of all the changes made to
(this branch on) this repository.
Merge Conflict
It’s time to introduce one of the scariest obstacles to newcomers: the conflict.
In our current state, GitHub Desktop shows No local changes and Fetch
origin will show that we are in sync with GitHub.
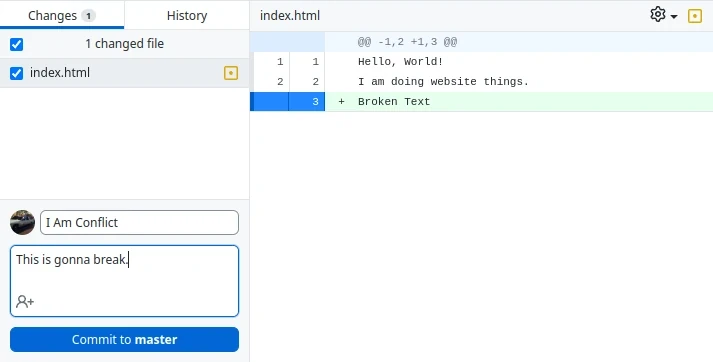
For demonstration, act as your Simulated User to add an additional line to
index.html.
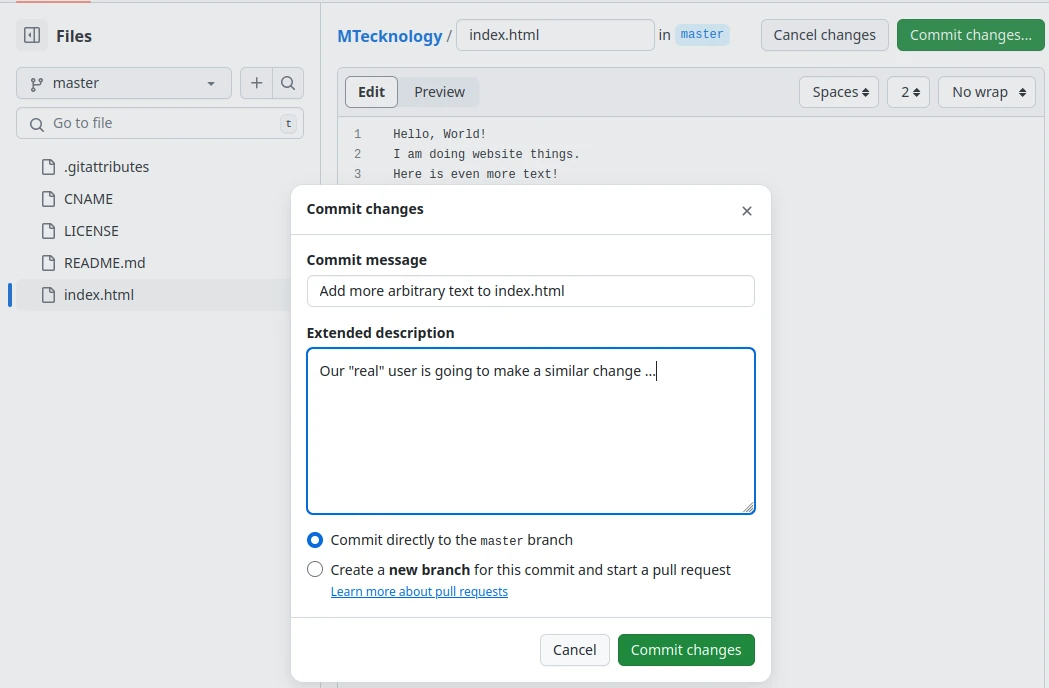
Now do similar for your local repository, but DO NOT click Fetch or
Pull. Instead, add some text to the end of index.html and then
immediately create a commit.
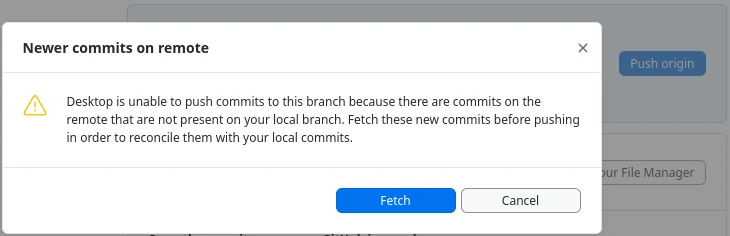
Similar to before, we are ready to Push our changes to the server. However,
we have not synchronized our changes, so our local copy has no awareness of
the changes our simulated user made.
Click Push origin and attempt to send your changes up to the server. At this
point, GitHub Desktop will discover that it cannot push these changes
because the local copy is stale.
Click Fetch to download changes made by the simulated user and then click
Pull origin to discover the merge conflict!
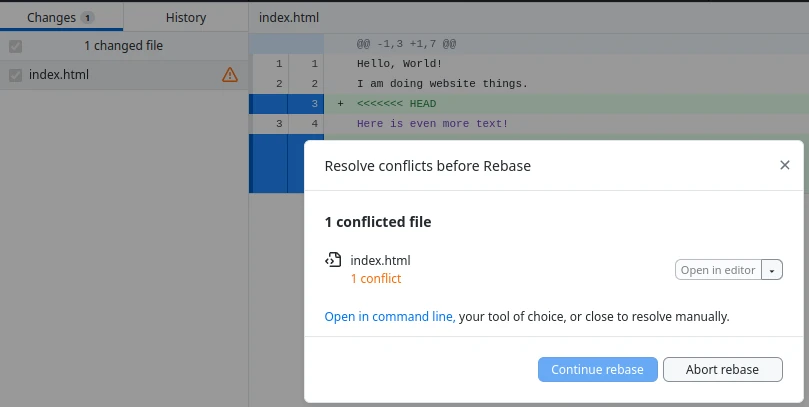
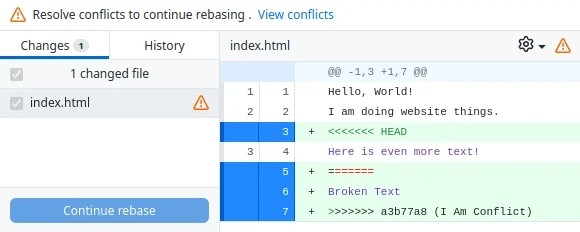
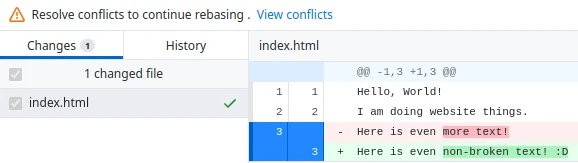
Open index.html with your preferred text editor and observe the following:
Hello, World!
I am doing website things.
<<<<<<< HEAD
Here is even more text!
=======
Broken Text
>>>>>>> a3b77a8 (I Am Conflict)
This is essentially both copies stored in one file. This uses the syntax:
<<<<<<< HEAD
    This is a copy of the changes we obtained from the server
=======
    This is a copy of our own changes
>>>>>>> a3b77a8 (I Am Conflict)
It is possible to have multiple conflicts in a single file, so these blocks may
show up multiple times, across multiple files. Git and GitHub Desktop
understand this syntax and provide help identifying their exact location.
In order to resolve each conflict, open the offending file in your preferred text editor, decide which version is appropriate to keep, delete the other, and then delete the surrounding syntax.
It is even possible to provide your own custom merge between these lines; however, this is discouraged and should only be used when absolutely needed.
At this point, you may click Continue rebase and your first encounter with a
very scary merge conflict should be near an end. Click Push origin to
send these merged commits sent back up to the server.
Your repository should now be synchronized with GitHub, meaning that anyone
who fetches the changes will have your updates with the conflict already
resolved.
Chapter Recap
The general best practice workflow when working with a git repo is:
Fetch/Pull changes first, before beginning any work
Make any required changes
Fetch/Pull any additional changes that someone may have pushed
Review your changes in
GitHub DesktopCreate a
commitusing a high quality messagePush these changes
Others can now fetch your own changes